Saturday, September 29, 2018

U6 - Paper City Work


There were some fantastic images from yesterday's session in the studio, now let's make the most of them in terms of what you present in your sketchbooks.
The following list is to clarify what you should be including for the paper city work:

  • 2 pages research into a paper engineering Artist (see previous post).
  • Any Laser-cuts that can be mounted flat (skylines or building facades) with some accompanying annotation briefly explaining the process (2 pages).
  • 1 or 2 pages for contact sheet thumbnails of your paper city photos.
  • 1 or 2 pages with some of your best shots printed larger (A5), these should basically unedited (some cropping may be beneficial).
  • A further 2 pages with some shots manipulated through PhotoShop - experiment with colour, layering and offsetting images, adding text and anything else you can think of.

Thursday, September 27, 2018

U6 - Planning Project Outcomes

Architectural Monoprint 

Project Outcomes:


As you complete the Collage stage you should start thinking ahead towards planning your project outcome. The format of this is down to you, it just needs to be inspired and visually informed by Modern Architecture and fall within the broad definition of Fine Art.
This could mean paintings, large scale mixed media work, sculpture, a series of prints, animations, books of illustrations, film.
The piece might be an extension of things we have already tackled in the project (a more ambitious collage or drawing for example) or it might explore an altogether different creative area.

There should be clear planning for your final piece in your sketchbook, so this means both annotation and imagery outlining your intentions. The nature of the imagery will depend on what you are planning, but it could take the form of painted studies, photos of 3D maquettes, sketches or many other things.
You should be aiming to complete this planning (over several sketchbook pages) over the next few days, so that we are ready to start working on project outcomes by the end of next week. If you have particular material requirements for your final piece then talk to staff so we can start organising these now.

As you begin work on outcomes next week remember to record your progress so you can include photos and imagery of the creative journey you take with this piece.

L6 - Moving into 3D

Following on from the relief based work the next challenge is moving fully into 3 dimensions to create a free standing sculpture. Obviously what you have learnt from creating the relief work will be vital, but there are a host of new things to consider as well. Here is a brief guide to a few of them:


BALANCE: The visual impression a sculpture gives to the viewer can be altered radically by how the piece is supported, pieces that are balanced on a few small points of contact with the ground tend to look more dynamic (for example the Eduardo Chillida piece below), whilst a sculpture with a large heavy base tends to give a much more stable, secure impression.
Eduardo Chillida

TENSION: Related to balance, this can refer to visual tension created by the impression that a structure is unstable. It can also be a reference to physical tension created by construction techniques, for example in this piece by Naum Gabo where the interconnecting wires are tensioned between the more substantial elements:
Naum Gabo

WEIGHT: This can refer to the physical weight of the sculpture (or elements of it), but more commonly would be used to describe the "visual weight", so a chunky solid volume (see the David Smith piece below) would tend to have more weight than a delicate linear element such as the wires in the Naum Gabo sculpture (above).

SPACE: The elements of a sculpture interact with the space that surrounds them. Space is the unspoken part of any sculpture. Making interesting spaces between the elements of a sculpture is as important as the elements themselves. The way Deacon's open construction below allows your eye to move through the piece above is a good illustration of this.

Richard Deacon
VOLUMES/PLANES: These are elements of several of the sculptures illustrated. Some like the David Smith piece are constructed entirely from Volumes, others such as the head by Gabo or Alexander Calder's "Canine" rely exclusively on planes of material to create the sculpture. Interesting work can be created by combining volumes with planes and even linear elements such as those employed by Gabo.
Alexander Calder
David Smith

Naum Gabo
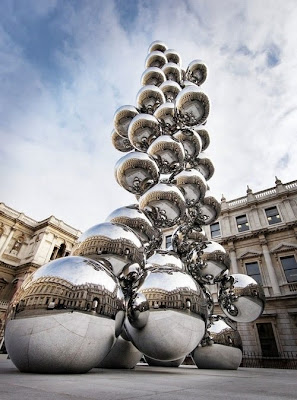
REPETITION: This is a useful way of making visual connections between different areas of your sculpture or adding visual emphasis and can be seen in the multiple globes in the Anish Kapoor piece below.

Anish Kapoor

CONSTRUCTION: This is vital. Whether sculptures actually stand, connect, balance and stay intact is dependent on how effectively they are constructed. With your own work you will find that measuring, cutting neatly and utilising joining techniques such as slotting and interlocking should minimise the need for glue and help you towards the best possible work. Using net templates for creating simple volumes can be helpful, some can be found here: www.Making-3D-Shapes.pdf

RHYTHM: In the same way that a 2D image can possess "Visual Rhythm" similar is true of 3 Dimensional Fine Art work. Directional elements can be used to lead the eye and repetition can create visual relationships. The steamed wood sculptures of Richard Deacon are a particularly good example of this.


Richard Deacon

SCALE: How we relate to sculpture is heavily dictated by its scale. Our reaction to a delicate piece we could hold in our palm (such as Tim Hawkinson's bird made of nail clippings) will be very different to how we respond to a piece such as Anthony Gormley's towering "Angel of the North" which is set on a hill top looming over Newcastle.


Anthony Gormley - Angel of the North
Tim Hawkinson
SURFACE: The materials sculptors choose and the textures these give to their work play a major role in how we, as the viewers, respond to 3 Dimensional work. Consider the contrast between the highly polished metallic surfaces in Anish Kapoor's piece compared to the steam treated wood in the second Richard Deacon piece illustrated.

L6 - Relief Sculpture, Supporting Research

    Frank Stella, relief sculpture.
Alongside the 3D phase of the project produce 2 pages of research into the 3D relief work of Frank Stella, the work we are doing in class forms the visual response, but you need to build an awareness of his techniques. You should be getting familiar with the format of research - you'll need brief background information about the Artist for context, good reproductions and analysis of some specific works, offering your own opinions and referring to formal elements such as technique, colour, form etc. 

This research should be complete by Monday 1st October.

Tuesday, September 25, 2018

U6 Architecture Collages and Supporting Research

Some examples from previous students.

By the end of Wednesday this week you should be aiming to create 4 (or more) mixed media collages. Use your existing Architecture imagery as the basis for this - prints, photos and drawings. Try manipulating them on the photocopier or through photoshop too. Combine this imagery with the additional collage ingredients supplied - coloured papers, stickers, tape, squared/graph paper, raffle tickets etc. 

A few pointers:
  • Inclusion of text, numbers and symbols can be very effective.
  • Using strong focal points (e.g. a larger image of a particular building) often helps your collages becoming too fragmented.
  • As well as papers you might work back into your collages with paint, pens etc.
  • Along with addition be aware that subtraction can be a key part of the collage process. If your images become overcrowded using areas of plain papers or white paint can be an effective way of freshening up your piece. Careful consideration about the retention of areas of space as you make the collage is another way to do this.
  • Producing a composition with balance that leads the viewer's eye as you intend is the ideal. Repetition of colours or symbols can help achieve this, along with strong directional elements.
Supporting Research
To inform your own collage experiments you should look at the work of all the following Artists/Designers who use collage techniques in creating their work. Once you have familiarised yourself with their work choose one of the Artists whose work is illustrated below and produce 2 pages of research into their practice. As usual obtain several good reproductions of their work, provide some background information and analyse at least 2 images in depth, identifying what media are being used and commenting on how they are being handled is particularly important. 
This research should be completed as Prep by Monday 1st October.

Richard Galpin

Martin O'Neill

Robert Rauschenberg

Nazario Graziano

Tim Marrs

Monday, September 24, 2018

L6: Tools Project Checklist (up to Monday 24th September)

Overlay Composition - Lucie Gonder
For reference this is the minimum you should have completed for the project so far: 
  • A range of photos of your tool - thumbnail prints of all your shots (20+) should be included in your sketchbook and 4 - 6 of your best shots printed off at A5 or A4 scale. Brief annotation identifying why you consider particular shots successful should also be present.
  • A completed sustained tonal drawing from your tool photos done in pencil - this should be at least A4 in scale and represent 3+ hours worth of work.
  • Set of 4 expressive timed graphite and chalk drawings done in class, mounted in book and briefly annotated.
  • Prep task research into Jim Dine (tool drawings) and Florian Nicolle (collages) over at least 4 pages (see additional guidance in previous post) and include at least one visual response in appropriate media.
  • At least one Gold card plate based on your tool photos cut and several prints taken from it, these prints and the plate should all be mounted in your book and annotated with a brief description of the process.
  • One or more digital manipulations of your Tool imagery (completed with Miss Corrigan). Annotate.
  • Mixed media collage with tool image drawn over A3.
  • A2 Charcoal mid-tone drawing, include photos of this in your book.
  • Minimum of 2 experiments working into reproductions of your tool prints with coloured inks.
  • Laser cut tool collage work completed with Miss Corrigan. Annotate.
  • At least 2 monoprints from your tool imagery completed with Ms. Mason. Annotate.
  • 2 pages of research into Jasper Johns, concentrating on his letter and number based overlay drawings, prints and paintings. Analyse and include a visual response.
  • One or more linear overlay drawings based on shapes found within your tools (refer to photos or earlier drawings/prints).
  • At least one PhotoShop linear overlay design.
  • One of these designs reproduced at A3 and worked into by hand with colour (ink or paint).
  • Digital design with colour added (100% digital piece). Annotate all these.
  • Select one of your linear overlay compositions and work in with tonal pattern and mark-making (biro works well).
If you have completed all that the following are suggested extension tasks:
  • A second sustained tool drawing in a different media (e.g. Biro, fine liner).
  • Visual responses to both Florian Nicolle and Jim Dine.
  • An additional Gold Card plate and prints based on your tool photos.
  • Further colour experiments with your letter overlay compositions (collage, pastel, paint, ink - experiment and mix your media).
Next Tasks:
  • Cut a complex A3 Gold Card plate based on your overlay composition drawings.
  • Collage experiments with your overlay compositions.
  • Research into the relief based sculptures of Frank Stella.
Then we should be ready to start moving into 3D!

Thursday, September 20, 2018

U6 - Architectural Printmaking, Supporting Research

Michael Goro - Print
  • Complete 2 pages of research into the prints of contemporary Artist Michael Goro - try to find a range of images of his prints that explore an Architectural theme.
  • As always with research consider layout carefully, keep pages busy and visually stimulating. Get good size reproductions of relevant works by Goro. The written content is also important, provide a brief section of background information about the Artist, but make sure you go on to analyse individual works in some detail.
  • Comment on use of media/technique (especially important to identify the printmaking processes Goro employs), and discuss formal elements such as use of line, tone, colour, mark-making and composition.
  • Research the intentions behind this series of works - what was Michael Goro trying to explore/capture?
To keep up with the pace of the project you should be completing this research by Tuesday 25th September at the latest.

U6 Architecture Project Update and Checklist

Digital Collage
So to recap on what you should have for the Architecture project so far (all this should be properly mounted and briefly annotated explaining processes and analysing the success of the images you have created):
  • A selection of photos of modern Architecture (around school and elsewhere), print contact sheets of your shoot and include 8 - 12 of the best shots printed out at A4 or A5 scale.
  • At least one fully finished full page sustained careful pencil tonal drawing from your Architectural photos (this should represent at least 3 hours work). 
  • A set of timed expressive drawings.
  • Photocopier experiments with your drawings and prints (inverts, colour adjustments).
  • A Gold Card print based on your College photos.
  • At least 4 pages of research into 2 contemporary Architects (see the project brief below for names). Include background information and analysis of some specific buildings/projects. Discuss materials, aesthetics (form) and function. Include good reproductions of the Architect's work and take care over presentation.
  • At least one A3 sustained and detailed monoprint based on a Architectural photograph.
  • Research into at least one Artist who uses paper engineering in their work, references here http://weburbanist.com/2008/12/02/papercraft-creative-paper-art-design-sculpture/
  • One hand cut white card building, ready for "paper city" shoot.
  • Research into Michael Goro's printmaking to support studio work (Prep).
  • Threshold photoshop images via Firefly to Mrs. Bicknell in readiness for screenprinting.
All this work should be completed to a high standard by Tuesday 25th September when we will share our progress in a class crit session.
Next Tasks:
  • Completion of laser cut buildings with Miss Corrigan for "paper city" shoot.
  • "Paper City" shoot in photographic studio next week with Mr. Bicknell.
  • Digital manipulation of "Paper City" Shots and printing of best images (Mr. Bicknell).
  • Screen printing with Mrs. Bicknell.
  • Laura Slater research to support screenprinting work.
  • Further exploration of monoprinting with Ms. Mason.
Extension Suggestions:
  • Research a second paper engineering Artist.
  • Additional drawings using other media - fine liner, biro etc. 

Wednesday, September 19, 2018

A few nice pieces of work from the U6 Architecture Project

Print - Aria Kalmar

Speed drawing - Charlie Gorringe

Edited Print - Chiara Jacobs

Speed Drawing - Yasemin Sazak

Tonal drawing - Phich Rodsawaeng

Print - Phich Rodsawaeng

Print - Amy Zhang

L6 - Tools Project Part 2


ART & DESIGN DEPARTMENT – 
BTEC ASSIGNMENT BRIEF  
                                                                                           
Qualification
BTEC National Extended Diploma Art and Design

Unit Coverage
Induction and skills acquisition project - Work essential for your progression portfolio.

Assignment title

Tools Part 2
Teachers/Assessors

Mr. I. Bicknell/Mrs. V. Mason/Mrs. G. Bicknell/Miss. L. Corrigan
Hand out date

20 September 2018
Hand in deadline

05 November 2018

Digital Response to Jasper Johns - Huw Williams
Card Sculptural Outcome
  

Vocational Scenario or context


This project builds upon the skills and imagery that you have generated in Tools Part 1 and presents an opportunity to further develop your drawing, printing and mark-making, to come to a better understanding of colour and composition and to work in both controlled and expressive ways.  It also offers the opportunity to manipulate materials in the process of exploring 3 dimensional forms. 

Tools Part 2 is divided into two sections. The first requires you to work in your sketchbooks to explore 2-dimensional space, form & line, layered shapes, mark-making, surface quality, colour, composition & layout and to develop an awareness of good design and composition using the shapes found within your tool imagery as a starting point.

The second requires you to interpret your 2 dimensional designs/ images into 3 dimensional forms using abstraction and to explore the language, techniques and materials of 3 -dimensional design (3DD) and sculpture.

In both sections you will study various artists in order to enhance your working practice and place the project into a relevant historical context.
Materials, equipment & resources
Pencil, fine-liner, biro, paint, pastel, collage, photo-shop, photocopy, acetate, ink, relief printing.
Card, paper, glue guns etc.

In addition to this brief please refer to https://btecartanddesignblog.blogspot.com/ for additional guidance throughout the project.


Task 1


·         Using pencil/fine-liner/biro or pen & ink, experiment with the tool forms as compositional elements to produce several different designs/images.  Start by using the tool outlines only and create several overlay examples (see Jasper Johns numbers).
·         You might return to photography to get additional images that focus on the forms found in your tools to help build your compositions.
·         Next explore more ideas based on your selected tools imagery by considering the following: changes of scale, symmetry & non-symmetry, positive and negative shapes and close cropping so that only part of the tool is visible.
·         Now start to play with some of this imagery by working into the negative and positive shapes with different types of mark making to create lively and interesting surface effects and a sense of depth and perspective. Your surfaces could be very expressive with an emphasis on fine art painting/ collage mark making etc or they could be more graphic.  Look at repetition and pattern, or combine both. An illusion of space can be created by considering the scale, weight and density of marks, and their relationship to areas of solid and void.
·         Produce research into Jasper Johns, this research should be presented carefully over at least 2 sketchbook pages, find relevant images of his work (the number overlay drawings and paintings) and analyse these alongside providing background information and a visual response in appropriate media.

Timescale for completion of this task:

Complete by Monday 24th September.

Assessment:


Weekly class crit, peer and teacher verbal feedback.

Task 2:


·         Select the strongest of your drawings and start to introduce colour. You may work on the whole design or take a section and enlarge it.  Explore the use of the following colour mediums: paint, oil pastel,  and mixed media collage. You will be shown any new techniques as you progress.
·         Explore your compositions by devoting some time to cutting and printing a detailed gold-card relief print.
·         Now take the development further: photocopy some of your images onto paper and acetate; play with scale, inversion etc. Look at cutting away, layering and overlay to create collages. Scan some of your images into the computer and manipulate further using PhotoShop.

Timescale for completion of this task:

By Monday 1st October

Assessment:


Weekly class crit, peer and teacher verbal feedback.


Task 3:


·         Look at the 3D relief sculptures of Frank Stella and complete at least 2 pages of research that analyses specific works by Stella.
·         Using the work of Frank Stella as inspiration take strong positive and negative shapes from your tool drawings/designs and then cut-out, raise and interlock shapes to produce a ‘relief’ version of your image from card.
·         Take a series of carefully lit photographs of your 3D relief piece and edit the best of these for inclusion in your sketchbook.
·         Developing from your relief make a series of design sketches exploring how you might develop the tool forms from your relief and drawings into fully 3 dimensional elements. These should be abstracted sections from your tools rather than trying to make full 3D reconstructions of the whole tool.

Timescale for completion of this task:

By Monday 8th September

Assessment:


Weekly class crit, peer and teacher verbal feedback.


Task  4:


·         You are now expected to produce a final, well finished 3 dimensional piece that will demonstrate a refined application of the materials and techniques that you have experimented with in the previous week. When you move into fully 3D construction the precision of your measuring, cutting and sticking becomes all important. You will need to ensure that your final piece works well from all angles. This sculpture should be no larger than approximately 50cm in any direction.
·         Ensure you obtain good photographs of your final piece and include these in your sketchbook. When taking these photos you should use a plain clean background and again consider lighting, viewpoint, details etc.
·         From the photos of your final sculpture complete a sustained tonal piece of drawing on a full page of your sketchbook.
·         Complete a word-processed project evaluation (further guidance on this will be issued).

Timescale for completion of this task:

Complete by Wednesday 24th October. Hand in for summative assessment.

Assessment:


Written feedback and indicative marks returned straight after half term.


Sources of information
to support you with this
Assignment


Refer to https://btecartanddesignblog.blogspot.com/ at regular intervals throughout the project for more detailed guidance on specific tasks, extension activities and useful links.


U6 - New Project Brief: Portfolio Construction

ART & DESIGN DEPARTMENT – BTEC ASSIGNMENT BRIEF                                                                                       ...